How to reinstall Windows: step-by-step instructions. How to reinstall Windows: step-by-step instructions How to install Windows 7 from a disk
Hello, site administrator remontcompa.ru, I have a question for you - how to install Windows 7 on a new computer, that is, on a blank hard drive without partitions? Surely there are some rules and if you don’t follow them, problems will definitely arise that you want to avoid. Georgy.
Installing Windows 7
Hello friends! Installing Windows 7 on your desktop computer or laptop from a disk, as well as from a flash drive, should not be accompanied by any difficulties after reading our article. We have prepared for you a detailed description of each step and included many illustrations. Having gone through all the installation steps with us, next time you will install Windows 7 without any outside help.
- Firstly, the official Windows 7 64-bit distribution can be downloaded from the official.
- Secondly, if you have UEFI BIOS and you want to install Windows 7 on a GPT disk, but don’t know how to do it, read our article.
- Thirdly, if you bought a new laptop with Windows 8.1 and want to install Windows 7 instead, then all the manipulations with the UEFI BIOS and the process of further system installation.
- Fourthly, if you have problems installing Windows 7, refer to our article -.
- Fifthly, if you don't have a disk drive, you can use our instructions and.
- Sixth, if you are installing Windows 7 from a flash drive, then be aware that Windows 7 does not support USB 3.0 (ports are usually colored blue), if your flash drive is USB 3.0, insert it into a USB 2.0 port.
So, final preparations before installing the operating system. What should you do first?
If you are installing Windows 7 on a hard drive with existing partitions, then you need to copy all your data from the partition on which you will install Windows 7. During the installation process, this partition will be formatted and information from it will be deleted.
If you are installing Windows 7 on a blank hard drive, then you don’t need to do anything, just read the article further.
In general, there is nothing complicated in all this, at the very beginning of the boot we press on the keyboard, in most cases these are the F2 or Delete keys, we entered the BIOS, here we need the “Boot Sequence” or “Boot” section. There are basically two types of BIOS, this window is Ami BIOS, we will look at setting it up in our article, if the window has a different interface, then you have Award BIOS, how to work in it is written in our article “BIOS booting from disk ".
As we can see, the first boot device is the hard drive - HDD: PM-MAXTOR STM3, use the arrows to highlight the first item 1st Boot Devise and press Enter.

In this menu, we will set the CD-ROM as the first boot device (First Boot Device), select it using the arrows on the keyboard, then Enter.

So the first disk drive, and the second one turned out to be a hard drive, that’s what you need.

Save the settings (press F10) and reboot.
If you have correctly set the BIOS to boot from the drive and you have an installation disk with Windows 7 in it, then the next time you boot the computer you will see a prompt on the monitor to boot from the Windows 7 installation disk - Press any key to boot from CD or DVD. We press any key on the keyboard, keep in mind that if you do not have time to press within a few seconds, the system will reboot and everything will start from the beginning.

The installation process of the operating system begins, wait patiently

Here you need to select the system language.

Install

We accept the terms of the agreement

Selecting the full installation

In this window we see the space of my 500 GB hard drive ( Disk 0) divided into two sections (Section 1 and Section 2). The Windows 7 operating system is already installed on the hard drive; I personally don’t need it and I want to reinstall it. Before installation, I will delete all existing partitions on the hard drive and create them again. In general, there is a rule that if you want to avoid errors when installing Windows 7, it is better to delete all existing partitions before installation and create them again or install the operating system directly into unallocated space.
Select with the left mouse Disk 0 Partition 2 and press the button Delete.

Select with the left mouse Disk 0 Partition 1 and press the button Delete .


Old sections have been deleted, we are creating new ones.
Select with the left mouse Unallocated disk space 0 and press Create.

In this window, you need to select the size of our future disk (C:), Windows 7 will be installed on it. Let’s choose a size of 200 GB, I think this will be quite enough. Click Apply.

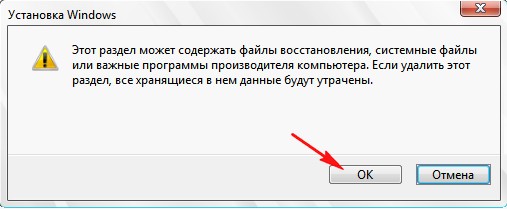
For Windows 7 to work correctly, you need to create a hidden partition of 100 MB with download files.
Therefore, when asked “To ensure that all of its features work correctly, Windows may create additional partitions for system files,” click OK.

On Disk 0 we now have a hidden partition Section 1: System Reserved(volume 100 megabytes) with Win 7 download files.
A second Partition 2 has also appeared, it will be the system drive (C:), its volume is 196.1 GB.
We convert the unoccupied space into a partition. Select it with the left mouse and click Create, this will be our drive (D:).

Apply
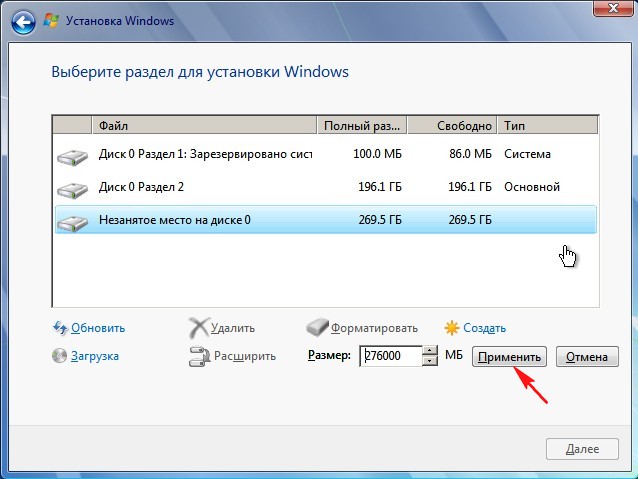
We will install Windows 7 on Disk 0 Partition 2: (future drive C:), select it with the left mouse and click Next.

The Windows 7 installation process begins.
In this article you will learn how to reinstall Windows 7 yourself. The material is designed for users who will be installing Windows on a computer or laptop for the first time. No matter how scary it may sound, reinstalling Windows is very simple. In the days of Windows 95 and 98, to an inexperienced person, the procedure of reinstalling the operating system could seem like a mystical rite. The person who was invited to do this was necessarily called a programmer and was considered a guru in the computer field.
For their part, such gurus, inflating their value, intimidated their clients in every possible way with scary computer terms and stories about viruses and burned-out computers. In this guide, you will see that this is not at all true and that installing or reinstalling Windows on your laptop or computer is very simple and accessible to almost anyone who knows how to use a computer mouse.
I will make a small reservation. This article will tell you how to install Windows 7 yourself using a DVD. If your computer or laptop does not have a DVD drive, then you will need to install Windows from a USB flash drive or from a memory card, I will talk about this in another lesson.
Before you start reinstalling Windows, read the entire article to the end, and if you have a printer, print it out.
Reinstalling Windows 7 consists of several steps:
- Preparing your computer for installing Windows 7;
- Preparing an installation disk with Windows 7;
- Setting up the computer's BIOS to boot from a DVD;
- Installing Windows 7;
Now let's go through all the stages in detail.
1. Preparing to install Windows 7
Before reinstalling Windows, you need to do a little preparation.
First, you need to copy all the valuable information from drive C. Of course, you know better, but I’ll still tell you where to look. There are not so many places where your useful information can be located on the “C:” drive, usually the desktop and “My Documents”. It’s also worth looking at the root of the “C:” drive; sometimes people, in a hurry or simply out of ignorance, save files there. Copy all the files you need to another drive (for example, “D:”), DVD drive or flash drive.
For the future, keep in mind that it is best to store information not on the same disk partition on which the system is installed, and, of course, create backup copies.
If you just purchased a computer or are sure that there is no valuable information in it, then naturally you don’t have to bother
Another point that is worth considering before installing Windows is the drivers for the network card. If after installation it turns out that your Windows distribution did not have drivers for your network card, or for some reason they were not installed correctly, then you will find yourself without drivers and without the Internet. Therefore, download the latest drivers in advance, at least for the network card.
2. Preparing an installation disk with Windows 7
For those who already have an installation disk with Windows 7, you can skip this step. If you don’t have such a disc, then you need to burn it or purchase it. Those who want to download Windows on the Internet, look for clean MSDN builds.
This will protect you from possible errors in the operation of the installed system.
Installation disks with Windows 7 on the Internet are usually distributed in the form of disk images in the ".iso" format. I won’t say where to download because... promoting their spread is not entirely legal. I can advise you to read the release comments before downloading the image; problematic disks are usually quickly identified in the form of a bunch of angry reviews.
At this stage, you should decide which version of Windows 7 to install on your computer, 32-bit or 64-bit. I will not go into details, since a separate article can be written on this topic. I will only say that a 64-bit system can work with the entire amount of RAM, while a 32-bit system uses only about 3.25 GB at most. At the same time, a 64-bit system, thanks to 64-bit address pointers, requires more memory during operation. This increases the amount of memory consumed by applications.
Also in favor of a 64-bit system, it is worth considering that when using 64-bit applications there will be a fairly good increase in their performance.
Conclusion: a 64-bit system should be used if the amount of RAM in your computer is 4 gigabytes or more, which, in principle, is already becoming the norm for a modern computer.
After the image is downloaded, you need to burn it to a DVD disc, and you can begin installation.
3. Setting up the computer BIOS to boot from a DVD
To install Windows, it is not enough to simply insert a DVD into the drive; you also need to make sure that the computer starts booting from this disk when you turn it on. This is done in the BIOS. There is a BIOS in almost any computer or laptop; all sorts of important settings are stored in it, one of these settings is the boot order of devices. This setting is what interests us at the moment.
In order to get into the BIOS, you need to immediately press a certain key on the keyboard when you turn on the computer. Usually, when booting, it is written on the screen what exactly you need to press to get to the BIOS menu. Most often this is the Delete, Esc, or F2 key. You will know that you have entered when you see the BIOS menu in front of you.
The most common options are:


If the attempt is unsuccessful, then reboot the computer and try again. Below are tables with possible options for entering the BIOS.
| BIOS Manufacturer | Keys |
| ALR Advanced Logic Research, Inc. | F2, Ctrl+Alt+Esc |
| AMD (Advanced Micro Devices, Inc.) BIOS | F1 |
| AMI (American Megatrends, Inc.) BIOS | Del |
| Award BIOS | Ctrl+Alt+Esc, Del |
| DTK (Datatech Enterprises Co.) BIOS | Esc |
| Phoenix BIOS | Ctrl+Alt+Esc, Ctrl+Alt+S, Ctrl+Alt+Ins |
| PC Manufacturer | Keys |
| Acer | F1, F2, Ctrl+Alt+Esc |
| A.S.T. | Ctrl+Alt+Esc, Ctrl+Alt+Del |
| Compaq | F10 |
| CompUSA | Del |
| Cybermax | Esc |
| Dell 400 | F3, F1 |
| Dell Dimension | F2, Del |
| Dell Inspiron | F2 |
| Dell Latitude | Fn+F1 |
| Dell Latitude | F2 |
| Dell Optiplex | Del, F2 |
| Dell Precision | F2 |
| eMachine | Del |
| Gateway | F1, F2 |
| HP | F1, F2 |
| IBM | F1 |
| IBM E-pro Laptop | F2 |
| IBM PS/2 | Ctrl+Alt+Ins then Ctrl+Alt+Del |
| IBM Thinkpad | from Windows: Programs >Thinkpad CFG |
| Intel Tangent | Del |
| Micron | F1, F2, or Del |
| Packard Bell | F1, F2, Del |
| Sony VAIO | F2, F3 |
| Tiger | Del |
| Toshiba | ESC, F1 |
After you have entered the BIOS, you need to find the option responsible for the boot order of devices. As a rule, these settings need to be looked for in the menu, the name of which contains the word BOOT; of course, there are other options, but as they say - “He who searches will always find.”
To make your search easier, here are a few examples of what it looks like in real life:


Selecting the device to boot first is usually done using the arrow keys on the keyboard, but there are other ways to navigate through the BIOS menu, so if you can’t figure it out, you can look at the help, which is usually visible in the BIOS.
Select your CD/DVD drive as the first boot device and exit the BIOS, saving all changes. To do this, use the Save and Exit Setup item. The computer will reboot and we have thus approached the next stage, for which everything was actually started.
4 Installing Windows 7
If the disk is written correctly and the settings in the BIOS are set correctly, we will see the following inscription Press any key to boot from CD or DVD, which means Press any key to boot from a CD or DVD.
It looks like this:

Press any key
If you don’t see such an inscription, then perhaps you did something written above incorrectly. In this case, check the BIOS again to see if the boot from DVD setting is saved; if everything is set correctly in the BIOS, then most likely your disk is not bootable and you will have to look for another installation disk or download another Windows 7 image.
At this point I will make a small disclaimer. You may come across a Windows 7 installation disk that contains, in addition to Windows itself, additional utilities; in this case, to start the installation, you will need to select the desired item from the menu of your disk. It is also worth noting that in some disks, most of the operations described below will take place automatically, without your participation. There is no need to worry about this; all these settings can be changed if desired after the installation of Windows is completed.

To begin installation, click "Install"

You will be faced with a choice of which version of Windows to install. You need to choose the one for which you have the key. If you have a laptop, then often a sticker with a key and an indication of the Windows version is glued to the bottom. We will need the key itself at the end of the installation. In principle, it can be introduced not immediately, but within 30 days.

We agree to the license terms and click “Next”

Select the full installation.

Select the partition in which Windows 7 will be installed and click "Disk Setup"

An inexperienced person may have questions at this point, so let’s look at it in more detail.
Hard drive setup
Often on your computer's hard drive, in addition to the partitions that you know about (such as C: D: E:, etc.), there may be one or more hidden partitions. This is especially true for laptops that were sold with an operating system already installed. The manufacturer makes such sections in order to be able to restore the system and bring the laptop to its factory settings.
Also often found is a hidden partition of 100MB in size; it is created by Windows 7 itself. This partition is used to implement the BitLocker function; this function is designed to encrypt the system partition. So, in this section there is a program that, when loaded, decodes the encrypted system partition. If you wish, you can get rid of this partition by preparing your computer’s hard drive for installing Windows 7 in advance. For this, it is best to use special programs, such as Acronis Disc Director.
Let's go back to the installation.
Click "Disk Setup" and "Format"

The installer will warn you that all data from this partition will be deleted, but we are not afraid of this, because we prepared for this and made a backup copy of all the information we needed in advance, so we boldly agree by clicking the “OK” button.

After formatting is completed, click “Next”

Waiting for the installation to complete

After installation, you will be prompted to enter your username and computer name.


We enter the key, it can be glued to the bottom of the laptop, or in the form of a sticker on the system unit.

Set a security mode

Set the date, time and time zone

If your computer has a network connection and the system has a driver for your network card, Windows will prompt you to select a connection type

This completes the installation of Windows 7, and you can proceed to installing the drivers and programs you need.

Finally, don’t forget to return the BIOS settings that we changed in paragraph 3 our leadership. You need to set your hard drive as the first boot device in the BIOS, otherwise every time you start the computer it will try to boot from the DVD.
(209 Votes)
Currently, the Windows operating system is installed on almost 90% of computers around the world. Microsoft's operating system is used everywhere: computers, tablets, servers, payment terminals, ATMs, medical equipment. The company has made a huge step forward by releasing the new Windows 10, but a certain part of users, even after the release of the eighth version, use Windows 7 in their daily work. Undoubtedly, in the process of interacting with the system certain questions arise, among which, perhaps, the most popular is: how to install Windows 7 from disk?
Most computer owners assume that installing Windows is something extraordinary, and only specialists can figure it out. But they are wrong, since there is nothing complicated about installing Windows. It is enough to follow the special instructions and strictly follow its points. Let's look at the OS installation process from the very beginning so that you get a complete answer to the question of how to install Windows 7 from a boot disk.
The entire Windows installation process can be divided into three stages:
- Downloading a Windows OS image and burning it to disk.
- Preparing the system for reinstallation.
- Installing Windows 7.
Before searching for an image, find out if your computer's processor supports 64-bit Windows. If you don’t have 4 GB of RAM, then feel free to download the 32-bit version (x86). It is also worth considering that for normal operation of Windows 7, at least 1 gigabyte of RAM is required. Does your computer have less RAM? Forget about installing Windows 7 on your PC, as it will constantly slow down and freeze.
Stage No. 1. Downloading the Windows image and burning it to disk
Undoubtedly, you can skip this step if you already have a disk with Windows 7. It is quite possible that you purchased a licensed or pirated disk with Windows at a computer store, copied it from a friend, or borrowed it from friends for a while. But what to do when it is not possible to buy a disk with an operating system, and among your friends there are no computer scientists or advanced users?
The only way for you to solve this problem is to download a system image from the Internet and burn it to disk for later installation. In this case you will need:
- a computer with a working optical drive that supports DVD recording;
- high-speed unlimited Internet access for downloading a disk image with a capacity of 2-4.37 GB;
- a convenient browser for working on the Internet, for example Google Chrome;
- blank DVD-R disc.
Let's start searching for a Windows image on the Internet. As a rule, operating system installation files can be downloaded on torrents. You won't find them on regular download sites because the owners of these sites are afraid to store pirated copies of Windows on their servers. But to download Windows 7 from a torrent, you will first need to download and install a torrent client on your computer. The most popular BitTorrent network client is uTorrent. Open your browser, type http://utorrent.com in the address bar and press Enter. On the official page of the uTorrent program, click the “Get uTorrent” button and in the next window select “free download”.
After downloading the installer, install it on your computer. The uTorrent client does not require configuration to work with bittorrent networks. You just need to specify the folder to save the downloaded files in the settings. Open the installed client and press two buttons on the keyboard at the same time: “Ctrl” and the Latin “P”. In the settings window that opens, on the left, select the “Folders” tab. Check the box next to “Place downloaded files in...” and specify the path to save the files. You can specify your desktop, any folder on drive D, or create a special folder for downloaded files. Save your changes to uTorrent settings and exit the program.

Open your browser and enter the address http://rutracker.org. Rutreker.org is one of the most popular trackers on the RuNet. The only disadvantage of the tracker is that to download a torrent file you will need to register on the site. Spend a couple of minutes registering a new account, but do not use Russian letters and spaces in your login, because in the future you will not be able to log in.
After successful authorization on the site, go to the “Desktop OS from Microsoft (starting with Windows XP)” section or open the link http://rutracker.org/forum/viewforum.php?f=2153.


Save the file with the .torrent extension to your desktop and close the browser.

Open uTorrent, click the “File” button in the top softbar and select “Add torrent”.

Specify the file with the .torrent extension saved on your desktop and click “Open”.

A new window on the right displays files that you can download to your computer. If you only need one image, then uncheck the other files and click the “Ok” button. For example, the picture below shows the download of the Windows 7 Professional X64 image. File names usually indicate the Windows version and bit depth. Don't forget to also download additional files in Word formats. They usually store Windows activation information.


After you finish downloading the Windows 7 ISO image file, close uTorrent.
Now you need to burn this downloaded image to a DVD. But you cannot do this with the standard “disc burning wizard”, since it does not support creating bootable disks. You can burn a disk image only using special utilities: Ultra ISO, Daemon Tools, CDBurnerXP, Ashampoo Burning Studio. Manuals on how each program works can be found on the Internet. If you do not have any of these programs installed, we recommend downloading the free Ashampoo Burning Studio program, which, in addition to burning images, can write any type of disc, copy music and movies. Open the website http://www.ashampoo.com in your browser and download the utility to your computer.
After installing the program, launch Ashampoo Burning Studio. Depending on the version of the program, the interface will vary slightly. Below is the process of burning an ISO image in the sixth version of Ashampoo Burning Studio Free.
Select the “Create/Burn a Disc Image” tab and follow the “Burn CD|DVD Disc from Image” link.

In the new window, specify the path to the downloaded file in .iso format by clicking the “Browse” button. Then click the “Next” button to move to the next step.

Insert a blank DVD into the drive and wait until the program says “The inserted DVD+R disc is good.” Then click the “Burn” button and wait for the process of burning the image to disk to complete.

Close Ashampoo Burning Studio Free and play the burned disc in the drive. If you see the following picture in the start window, it means the disc was burned normally:

This completes the first stage of preparation for installing Windows 7 from disk.
Stage No. 2. Preparing the system for reinstallation
Before you begin installing the system, save all important data to drive D. Everything that is on the desktop must also be moved to another local drive, since installing Windows will erase all information from drive C. If you only have one drive C , then save your documents and photos to a flash drive or external hard drive.
In addition, take care of the drivers for your system, since it is likely that after installing Windows, your Internet will not work and you will not be able to download drivers. If Windows is installed on a laptop, then there should be a driver disk in the box with the laptop. No disk? No problem, open the official website of your mobile PC manufacturer and download drivers for all your equipment.
Now you need to set automatic loading from disk. Typically, when Windows starts up, it first accesses the hard drive and then the drive. In the BIOS settings, you need to set the boot priority so that the optical drive is first in line. At the first sign of the computer booting, just press a special button, usually F2 or Del, to get into the BIOS settings.

Depending on the BIOS version, the location of the “First Boot Device” item may vary. Navigation through the BIOS is carried out using the navigation keys, confirmation or rejection of saving settings is done using the “Y” or “N” buttons, and selection is made using the Enter key.

Find the item “First Boot Device / Boot Device Priority”, specify “CD-Rom” as the first device and save the settings with the F10 button.
However, you can do without digging into the BIOS sections. When booting the computer, just press the special hotkey (F8-F12 depending on the BIOS version). A list of bootable devices will open: use the navigation keys on your keyboard to select “CD-Rom” and press Enter.

So, if you have set boot priority from CD/DVD, insert the disc into your computer and restart it. The drive will automatically pick up the disc and the Windows installation process will begin. If you have problems changing the boot priority, watch the following video:
Stage No. 3. Installing Windows 7
How to install Windows 7 from a boot disk? It's time to start resolving this issue.
After booting the computer with the disk, the message “Press any key to boot from cd or dvd” will appear on the monitor screen. Press any key on your keyboard to continue with the installation. If you do not click any button within the first 30 seconds, the system already installed on your computer will automatically load.

After the “Windows is loading files” process is completed, the familiar window will open, in which you need to select the Russian language and click “Next”.

In the new window, click the “Install” button.

If you downloaded an image that contains several versions of Windows, then in the next window, indicate the Windows 7 that you want to install on your computer. In this case, be sure to take into account the bit capacity of the system.

If the downloaded image contained only one version of Windows, then you will not have this window when installing the OS. At the next stage, we agree to the Microsoft license terms, check the box “I accept the agreement” and click the “Next” button.

In the “Windows Installation” window, select “Full installation” of the system. It is not recommended to update the system, since in the case of a full installation, the entire disk is formatted and all the problems that you had with the previous Windows disappear along with the formatting.

Is your hard drive divided into 2 partitions? Select the disk on which the system was previously installed and click the “Disk Configuration” button.

Experienced users create two disks: one local disk with a capacity of 50 GB for installing the system, and the remaining space on the hard drive for another local disk, which usually stores multimedia files. You can partition disks when installing Windows, but keep in mind that when formatting partitions you will lose all data.
After formatting the partition, copying and installing Windows 7 files will begin. This procedure, depending on the power of the computer’s hardware, lasts from 15 to 50 minutes.

After installation is complete, you will need to configure Windows 7. At the first stage, enter the name of your account (User, Admin, Vasya, Petya, etc.).

In the next step, you can enter a password for your account. If you don't need a password, just click the "Next" button.

If you bought a licensed version of Windows, then specify the special key from the disc box. Otherwise, uncheck the box “Automatically activate when connected to the Internet” and then use the “tablet” that came with this image.

Next, you will need to specify your protection settings: select “Use recommended settings.” In the last steps of setup, specify your time zone and current time. If the PC is connected to the Internet, then in the settings of the current location of the computer, click “Public Network”.
Once the setup is complete, you will see a clean desktop with only a “trash” icon.

Do you want to know how to install Windows 7 on a laptop for free? Are you faced with the need to reinstall the operating system, but don’t know how to do it? Our step-by-step installation instructions will help you find answers to these and many other questions.
We will talk about three options for downloading Windows 7: from a USB flash drive, a CD, and directly from a computer. In addition, you will learn how to configure the BIOS with any of these options. Our instructions for dummies will help you reinstall Windows yourself and solve other related problems.
Undoubtedly, installing Windows is much simpler than, for example, installing Android, however, we will have to figure something out.
Important: Please read before installation
When installing Windows 7, you first need to determine the characteristics of your computer. If its RAM is less than 2 GB, then a 32-bit operating system (OS) with an 86-bit platform is suitable for you. Most modern laptops have more than 2 GB of RAM installed, in which case you can safely install a 64-bit OS.
Information about the amount of memory can be obtained by opening the properties of the computer. Right-click on the “My Computer” icon on the desktop, select properties from the menu, and see what the installed memory (RAM) is.
Preparing to install the OS
Do not forget that the partition of the disk on which the installation is performed will be formatted and the information will be deleted. All the data you need should be saved in the partition of the computer that will not be formatted, or on external media.
To install, you will need a bootable CD or USB flash drive containing Windows 7. Another option is a virtual image of the system, the features of which are described below.
Burning a disc with the distribution kit
To create a boot disk from scratch, we will need:
- a clean blank, which must be checked for damage and contamination, since any defects can lead to failure during recording;
- OS image downloaded from the Internet;
- recording program.
There are a huge variety of programs: Nero Burning Rom, UltraIso, CDBurnerXP, InfraRecorder. In this case, we will use the modest Small CD-Writer utility, which must first be downloaded and installed.
After installation, perform the following steps:

Thus, if the startup process on the computer is not disabled, and everything is recorded correctly, then a menu should appear from which you can start installing Windows.
Sometimes PC users wonder how to install Windows 7 on a laptop without a disk or flash drive? This installation method is possible, but only if the computer has a valid operating system:
- download the Daemon tools lite program from the official website. We install it by selecting a free license during the installation process. After installing the program, launch it; your new virtual drive should be displayed at the bottom of the window that opens;

- launch the program. If after installing it the drive does not appear for some reason, select the shortcut with the DT icon in the tabs - add a virtual DT drive, which will now be displayed along with hard drives and other devices;

- then select “add image”. And we indicate the path to the previously downloaded windows image, which must be in ISO format;
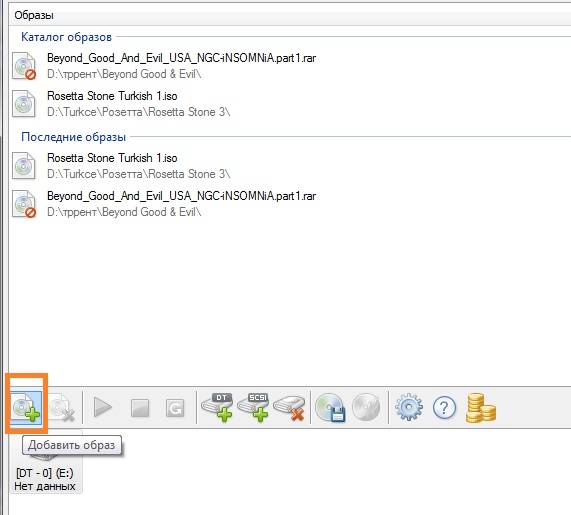
- the disk will appear in the image directory, from where you can mount it into the drive - launch it by double-clicking the mouse, or call up the menu with the right mouse button and select “mount”;

- A window appears with the words “Run Setup.exe”. Click on this inscription, after which the installation begins;

- You can also launch the disk by opening devices with removable media through the “Computer” shortcut. Your disk is displayed there, right-click to open the menu and select launch. The installation begins from the hard drive.
BIOS options for booting from DVD
If you need to boot from CDs, you need to perform the same manipulations as when booting from USB, with only one difference - when specifying the boot location, you need to select CD ROM instead of Hard Disk.
By the way, on some computers you can specify the boot device without going into the BIOS settings. If during a reboot you see Select Booting Device at the bottom of the black screen, then you have this option!

When you press the appropriate key, a simple menu appears.
To select a hard drive or flash drive we need:

After installation, you need to return to the BIOS and set First Boot device - your hard drive.
Installing Windows 7 on a new laptop
If you purchased a new computer on which the OS is not installed, you will need to install it through the BIOS. In addition, it may be necessary to install Windows via bios after replacing the hard drive or in another case when other methods are not available.
You will need removable media - a disk or bootable USB flash drive.
To get started you need:

In our case, this option is not suitable, since we are installing Windows on an empty laptop without an OS.
Therefore, we have two other options: if we need to boot the system from a CD, we select CD ROM, and if from a flash drive, then USB-HDD.


After the procedures have been completed, the computer will begin to reboot, and during boot time you will see the message “Press any key to boot from cd or dvd” on the black screen. We press any button, after which windows starts loading from the selected device.
Starting the installation
We made the BIOS settings, connected the USB to the laptop, or put a CD in the drive. A reboot occurs, then the text appears on the screen: “Press any key to boot from CD/DVD.” Click on any button, thereby starting the OS installation.
Installation language
We will be asked to select the installation language, then the input language, as well as the Windows interface language.
Then click Install Now and read the license agreement, which must be confirmed by checking the box next to the inscription: “I accept the license agreement.”

type of instalation
One of two methods can be used here:
- full installation, which involves formatting the hard drive. It is also called a “clean install”;
- updating an earlier version of the OS that is currently installed on your laptop.
If you do not have any important data left on the disk you are formatting, it is preferable to choose the first option.
Video: Installing Windows 7. Step by step guide
Which partition to install in?
A pre-partitioned hard drive has multiple logical partitions. The OS partition must be formatted in order to perform a clean installation.
If you want Windows 7 to be a second system on your laptop, along with an already installed OS, for example, Windows 8, then you should install it in another logical partition of the hard drive.
If you install Windows 7 on an unformatted partition with an identical OS version, then all the old data will be placed in a separate Windows.old folder, and you will be able to view the files of the old system, or you will be able to delete it.
Formatting a partition
Select the section we need. Please note that we now have the opportunity to delete, format or create a new partition on the hard drive. Windows Setup only allows Quick Format, which is used to completely erase your data.

Copying files and rebooting
The program will copy the files, rebooting several times in the process. The OS will then configure and check the hardware, and then ask you to enter the computer name, as well as your name, to create an account.
Activating Windows
The system will require you to provide your product key. You can also skip this step. Without activation, you will be able to use Windows for another 30 days. Once the product key has been entered, you must confirm the activation.
Unlicensed versions of the OS can be activated using special programs.
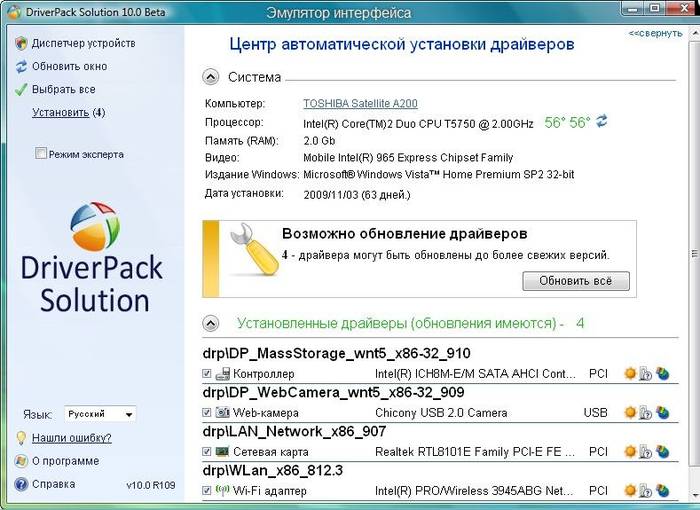
Installing drivers
After the OS is installed, you need to take care of the drivers, without which the computer will not be able to function properly. Currently, there are various builds of Windows with built-in drivers, but there is nothing better than using the “native” ones, which are usually located on the disk included with the laptop or posted on the manufacturer’s website.
Programs and utilities for working in the system
There are many different programs and utilities that you cannot do without when working on your computer. First of all, you need an antivirus, which it is advisable to install before going online. Then you will definitely need an archiver, an Internet browser, and various codecs. And if you work with documents, you also need office programs, such as Microsoft Office.
OS optimization
Optimization is needed to improve computer performance.
You can note the main points that can improve its performance:
- disable visual effects. Sometimes external effects interfere with good performance, this is especially noticeable if the computer is equipped with an insufficiently powerful processor or a small amount of RAM;
- disabling autorun of unnecessary programs. Unnecessary programs in startup load the processor and prevent it from performing necessary actions;
- disabling unnecessary services. We absolutely do not need some services used by our computer;
- removal of gadgets. Gadgets make working on a laptop easier, but at the same time they waste system resources. You should not install them unless absolutely necessary;
- removing unused programs;
- removing unnecessary shortcuts from the desktop.
Video: Optimizing the operating system
Windows 7 OS itself can tell you the necessary steps for optimization:
- click Start;
- go to the control panel, select “Counters and performance tools”;
- and now next to the “?” Find "Tips to improve computer performance" and read and follow the instructions.
Installation errors
Sometimes there are problems installing Windows. For example, the OS cannot be installed. Or during use the laptop gives an error.
Users often encounter difficulties such as:
- blue screen - most often this error occurs due to various RAM problems. First of all, you should check if dust has clogged the slots;
- The laptop turns off - this problem can occur for many different reasons, but one of the main ones may be overheating of the laptop. Perhaps it's time to clean it. It is also likely that the difficulties are related to improper operation of the power supply;
- Can't see the hard drive.
To solve this problem, you can try the following method:

Installation cost
Difficulties that may arise during the Windows 7 installation process may be stopping you from thinking about reinstalling it. The price of the issue is the stable operation of your laptop.
Most likely, you have thought about whether you should contact specialists, or save money and do everything yourself.
Leading computer service centers offer their repair and installation services. The price may vary depending on the complexity of the work. The minimum cost starts from 300 rubles. The maximum is usually not indicated.
Prices for services
Type of work
Cost, rub
Visit of the master
For free
Installation (reinstallation) of Windows 7
from 300
Installing (reinstalling) Windows Vista
from 300
Installation (reinstallation) of Windows 8
from 550
Installation (reinstallation) of Windows XP
from 550
Installing Windows Server
from 900
Using these step-by-step instructions for dummies, you can independently go through all the steps necessary to reinstall the Windows 7 operating system, as well as to configure and optimize it.
In order to start working on a computer, you first need to install the operating system. Without it, your PC is just a collection of devices that won’t even “understand” how to interact with each other and with the user. Let's figure out how to properly install Windows 7 from a CD onto a computer or laptop.
Despite the fact that the procedure for installing an operating system is not nearly as complicated a process as some beginners imagine, it is still a complex procedure that consists of several stages:
- Setting up BIOS or UEFI;
- Formatting the system partition;
- Direct OS installation.
In addition, depending on the specific situation and hardware settings, some additional subtasks may be added during OS installation. Next, we will look at the step-by-step procedure for installing Windows 7 from a CD. The algorithm of actions described below is suitable for installing the OS on both standard HDD format hard drives and SSDs, as well as on media with GPT partitioning.
Step 1: BIOS or UEFI setup
First of all, you need to configure the system software, which is built into the motherboard, to boot the PC from a disk inserted into the drive. Such software is various versions of BIOS or its later analogue - UEFI.
Let's immediately look at how to configure the BIOS. The algorithm of actions may differ for different versions of this system software, so we will provide a general diagram.
- In order to open the BIOS, you need to immediately press a specific key or group of keys when the signal sounds after turning on the computer. The specific option depends on the BIOS version itself. In most cases this Del, F2 or F10, but there may be other variations. As a rule, you can see the name of the required key to go to the system software interface at the bottom of the window immediately after turning on the computer. On laptops, in addition, there may be a special button for quick navigation directly on the case.
- After pressing the desired key, the BIOS interface will open. Now you need to go to the section where the order of devices from which the system is loaded is determined. For example, in the BIOS produced by AMI, this section is called "Boot".

For the analogue from Phoenix-Award, you need to go to the section "Advanced BIOS Features".

You can navigate through sections using the keys "Left", "Right", "Up", « Down", which are indicated on the keyboard as arrows, as well as keys Enter.
- In the window that opens, you need to perform manipulations to designate the CD/DVD drive as the first device from which the system will boot. There are differences in this between different BIOS versions.
For AMI, this is done by pressing the arrows on the keyboard and setting the name "CDROM" to the first place in the list opposite the parameter "1st Boot Device".

For Phoenix-Award systems this is done by selecting "First Boot Device" values "CDROM" from the drop-down list.

Other BIOS versions may have different variations of actions, but the essence remains the same: you need to specify the CD drive first in the list of devices to boot the system.
- Once the necessary parameters have been set, return to the main BIOS menu. In order to close this system software, but at the same time save all changes made, use the key F10. If necessary, you should confirm the exit by pressing the items "Save" And "Exit" in dialog boxes.

This will configure the BIOS to boot the system from the CD ROM. If you have UEFI enabled, then you do not need to make any additional settings when installing the system from a CD/DVD drive and you can skip the first step.
Stage 2: Selecting a partition for installation
At the previous stage, the preparatory work was completed, and then we will move directly to manipulating the installation disk.
- Insert the Windows 7 installation disc into the drive and restart the computer. It will start from the CD/DVD drive. A localization selection window will open. In the corresponding fields from the drop-down lists, select the language you need, the keyboard layout, as well as the format of currency and time, if the default options are not satisfactory for you. After specifying the desired settings, click "Further".
- A window opens in which you should indicate what you need to do: install the system or restore it. Click on a clearly visible button "Install".
- Now a window will open with a license agreement that applies to the edition of Windows 7 being installed. Read it carefully and, if you agree with all the points, check the box next to the inscription “I accept the conditions...”. To continue installation, click "Further".
- Then a window will open asking you to choose one of two options: "Update" or "Full installation". Since we are considering installation, click on the second option.
- Now a window opens for selecting a disk partition where the OS files will be installed directly. Select the partition that you need for these purposes, but it is important to make sure that there is no data on it. Therefore, you cannot select the HDD volume on which user information is stored (documents, photos, videos, etc.). Determine which partition corresponds to the usual drive letters that you see in "Explorer", you can by looking at its volume. In the case where the hard drive where the system will be installed has never been used before, it is better to choose for installation "Section 1", unless, of course, you have compelling reasons not to do so.
If you are sure that the section is completely empty and does not contain any hidden objects, then simply select it and click "Further". Then go straight to Stage 4.

If you know that data is stored in the partition, or you are not sure that there are no hidden objects, then in this case you need to perform the formatting procedure. If you have not done this before, you can do this directly through the Windows installation tool interface.


Stage 3: Formatting the partition
Formatting a partition involves erasing all the data that is on it and reformatting the volume structure to the option required for installing Windows. Therefore, if there is any important user data in the selected HDD volume, it must first be transferred to another hard drive partition or other media to prevent loss of information. It is especially important to format if you are going to reinstall the OS. This is due to the fact that if you install a new Windows on top of the old system, the residual files of the previous OS may negatively affect the correct operation of the computer after reinstallation.

Stage 4: System installation


Step 5: Post-installation setup
After the installation of Windows 7 is completed, you need to perform a few more steps to configure the system so that you can proceed directly to using it.
- Immediately after installation, a window will open where you will need to enter the computer name and create the first user profile. In field "Enter username" Enter a custom profile (account) name. In field "Enter your computer name" Enter also a custom PC name. But unlike the account name, in the second case the introduction of characters of the Cyrillic alphabet is not allowed. Therefore, use only numbers and Latin alphabet. After completing these instructions, press "Further".
- In the next window, you can enter the password for the account you created earlier. This is not necessary, but if you are concerned about the security of the system, it is better to use this feature. In the first two fields, enter the same random password, which you will use to log into the system in the future. In field "Enter a hint" You can enter any word or expression that will help you remember the code if you suddenly forget it. Then click "Further". The same button should also be clicked if you decide not to protect your account. Only then should all fields be left blank.
- The next step requires you to enter your Microsoft license key. It should be in the box with the installation disc. Enter this code in the field, make sure that next to the parameter "Automatically activate..." there was a mark, and press "Further".
- A window opens where you can select the parameters to set from three options:
- "Use recommended...";
- “Install the most important...”;
- "Postpone the decision".
- In the next window, set the time zone, date and time according to your localization. After completing the settings, click "Further".

- If the installer detects a network card driver located on the PC’s hard drive, it will prompt you to configure the network connection. Select the connection option that you consider preferable, make the necessary settings and click "Further".

- After this, the installation window will be closed and the familiar Windows 7 interface will open. At this point, the installation procedure for this OS can be considered complete. But for comfortable work you still have to install the necessary drivers and programs.


Installing Windows 7 is not very difficult. The installer interface is quite simple and intuitive, so even a beginner should be able to cope with the task. But if you use the guide from this article during installation, this will help you avoid all sorts of difficulties and problems that may nevertheless arise when performing this important procedure.